
To me, it never feels quite like the holidays until I’ve put together my holiday makeup look for all of you. This year, we asked you what kind of look you wanted to see in the Radiant Rebel Facebook Group. While there were a wide variety of requests, two things were commonly repeated: smokey eye & nude lip 💄.
With these two goals in mind, I also wanted to make sure that the look I created was flexible. The look I came up with is neutral enough that it can be worn with just about any outfit for any occasion. So without further ado…
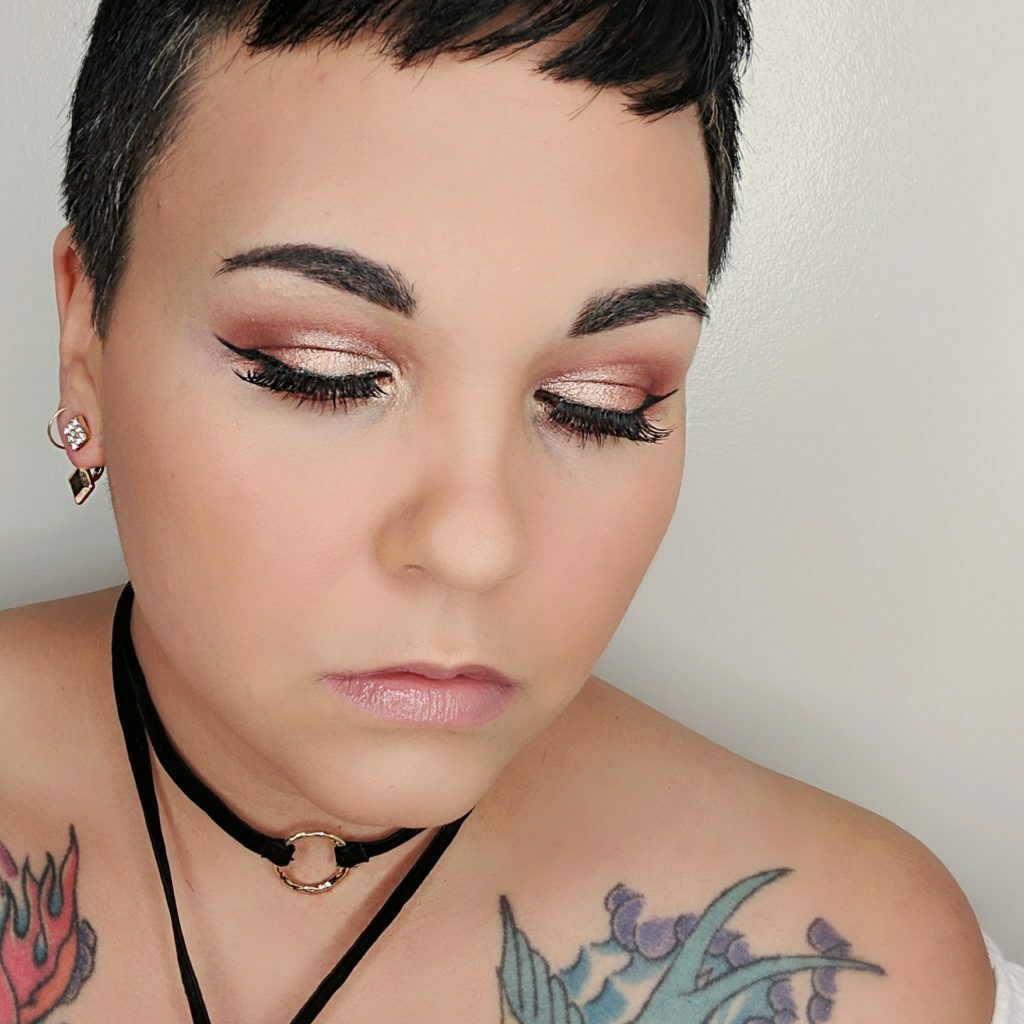
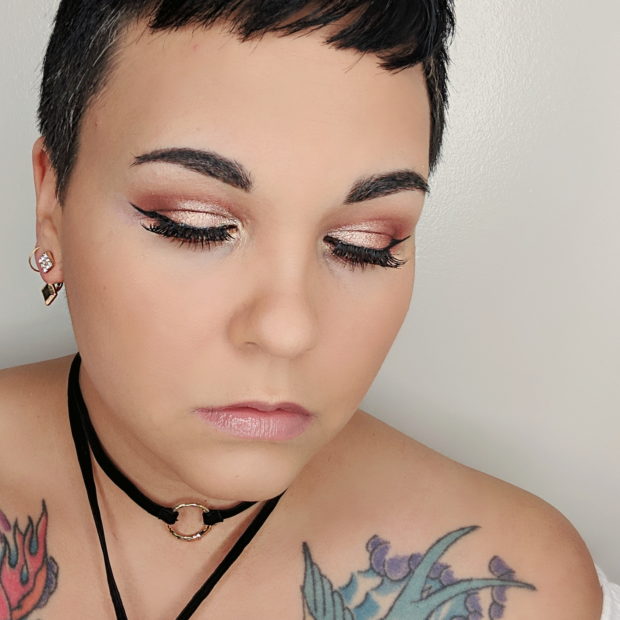
🔻🎄🔻 Here’s the final look I came up with 🔻🎄🔻
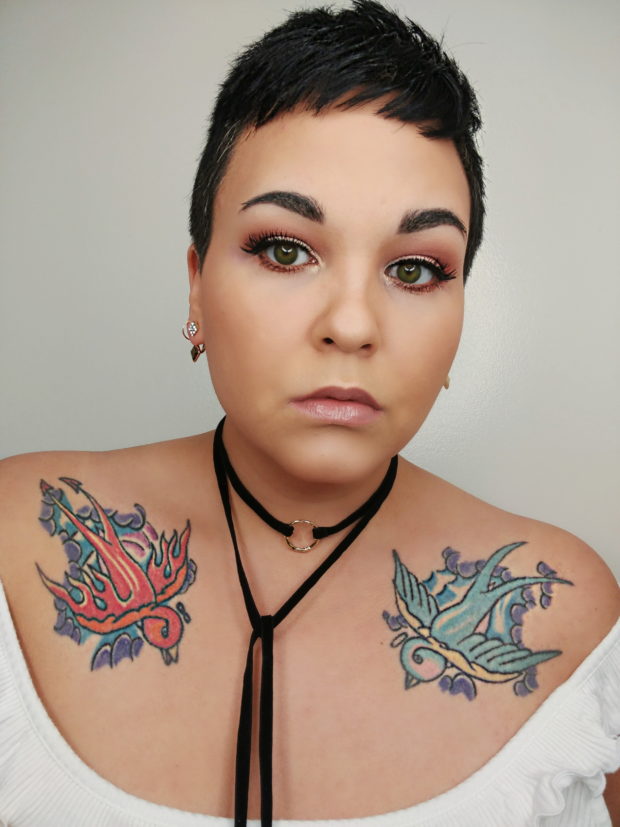
Here’s what you need to create this holiday makeup look
Eyes
- Pressed Mineral Eyeshadows: Peachy Keen // Toasted Oats // Mahogany Mimosa // Walnut Wishes // Rose Gold // Summer Peony
- Clean Slate Mascara
- Optional: Naturally Now Brow Pomade (my shade is Dark) & Clean Lines Liquid Eyeliner
Face
- Whipped Foundation (my perfect shade is granola)
- Mineral Cream Concealer: Cotton Cream
- Oil Absorbing Setting Powder
- Pressed Mineral Blush: Mallow Melon
Lips
- Lip Gloss: Rose Petal
The face makeup is my regular routine and I feel confident enough in your abilities to swipe on some Lip Gloss but if you want to learn how I achieve the eye makeup look, keep reading.

Pink Smokey Eye Step-by-Step
- Whenever I have the desire to do a detailed eye look, I’ll always start with the eye makeup first. This makes any clean up easier and ensures I don’t have to ruin my face makeup in the process.
- The first step is to prime the lids. I like to use the Cotton Cream Mineral Concealer for this. It really helps to cancel out any discolouration on my lids. I’ll pat and blend the concealer over the entire lid, right up my brows.
- Set the concealer with Peachy Keen to ensure that our other colours won’t stick and are easy to blend.
- Using a fluffy, blending brush, start building your crease with Toasted Oats.
- With a smaller blending blush, deepen the crease with Mahogany Mimosa. I went in a couple time to really build the colour.
- In the outer ‘V’, I used Walnut Wishes to keep with the neutral tones but to take that outer corner one shade deeper.
- Now for some shimmer ✨. On the inner half of my lid, I used my finger to pat in Rose Gold. This helps create an intense and pigmented glow.
- For the middle of my lid to the outer ‘V’, I use the same finger technique to apply Summer Peony. This created a gorgeous shimmer ombre.
- I dipped back into both Mahogany Mimosa and Walnut Wishes to go back over the areas I previously applied these. This helps to blend out any lines caused by applying the shimmer.
- The last step for my lids was to take the brush I used to blend Toasted Oats on my crease and just go over everything. I wanted to make sure it was all blended properly. I did this without adding any new product to the brush. The residual shadow on the brush should be enough.
- If you find that your shadows got a little wild in the outer corners, you can use some concealer to sharpen the cat eye.
- After that, I will pause on my eyes and do the rest of my face makeup.
- Once the rest of my face was in place, I took a clean, small blending brush to smoke out my bottom lashes with Toasted Oats.
- Using a tiny detail brush, I deepened the lash line with a mix of Mahogany Mimosa and Walnut Wishes.
- I opened up my eyes with a pop of Rose Gold on the inner corner.
- Optional: Add a wing eyeliner for a more dramatic look with the Clean Lines Liquid Eyeliner.
- Brush on a couple layers of Clean Slate Mascara. If you’re feeling extra fancy, you can pop on a pair of false lashes like I did. I normally don’t do a winged liner but it hides and false lash bands beautifully so I figured why not 💁- LOL!
When I finished this look, I can honestly say I was tickled pink. I’m pretty sure I’ve never tried this combo from our collection before, but I can assure you it won’t be the last! It may seem like a lot of steps but I wanted to provide as much detail as possible to make sure this look was as straightforward as possible, even for our beginners. Above all, take your time, use a light hand and make sure you blend each step really well.
Have a few holiday parties and want to mix it up a bit? Check out these past looks that are fantastic holiday options as well.
- Silver smokey eyeshadow tutorial
- Chilly enchantment
- Autumn eyeshadow tutorial (gold eyes/ red lips)
If you decide to give this look a go (or your own version of it) be sure to share it with us on social media. Simply tag us in your photos (@battysbath) or use the hashtag #radiantrebel!
![]()

")


")


)")


)")


